
Miele Novotronic W1511 Waterproof Fault
Feb 22
This post is nothing to do with anything.
I just fixed my washing machine – a Miele Novotronic W1511 as sold in Australia – and I thought I’d share how, in case someone else experiencing the horror of seeing “Waterproof Fault” flashing on their beautiful piece of German engineering jumps on Google to find how to fix it…
I’m not qualified to fix washing machines. You might die if you follow my instructions. So might your beautiful piece of German engineering. Your warranty certainly will die, if you still have one and you start taking your machine to bits. Your safest bet is always to find your local authorised service agent.
Waterproof Fault
This washing machine is boxed in on all six sides. So it has a base. The base has a slight depression in it (i.e. a low point) in which a sensor is mounted. When water gathers in that trough, the sensor gives the warning on screen “waterproof fault”, and the machine refuses to do anything else. I don’t know if anything else can cause the same fault, or whether the sensor can produce any different fault codes.
The easiest way to test whether the machine is leaking is to tilt it forward and see if water runs out from the bottom. Actually, that’s not very easy – they’re incredibly heavy.
In my case, the problem was a tiny hole in the drain sump hose, which runs between the wash bowl and the pump. I was cursing about a $1500 machine developing a hole in a highly flexible piece of rubber in just 6 years, and then when I took the hose off, I found this inside:

It probably did well to last 6 years really…
So all I can offer is how to get as far as taking the sump hose off, which includes getting to the point where you can see where the water comes from.
Tools
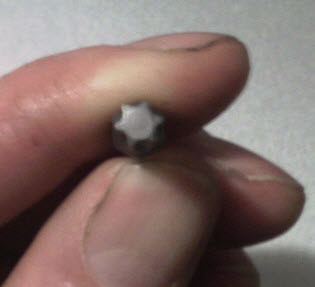
The ‘star’ pattern of a torx bit.
You’ll need, at least, a set of Torx bits. These are used to undo the fancy-pants secret agent screws that manufacturers use when they don’t want you, the commoner, to be messing with their stuff (and you shouldn’t be – why are you even still reading?) Fortunately you can get quite a comprehensive set of such bits for around $30 (I got mine from Dick Smith Electronics when I was repairing my mobile phone). If you haven’t already got a set, that’s $30 you’re not saving by doing it yourself.
For this adventure, I had to use the number 20 bit for all the screws except one, which was a number 30.
A set of pliers may be required to take a hose clamp off. Other hose clamps use a standard Phillip’s head (‘crosshead’) screwdriver. A torch is good. A flat blade screwdriver is always handy too.
Resealable bags and a permanent marker are good for keeping track of which screws went where…
Method
The overview is that you have to pull the front off the machine, which requires three broad steps:
- Loosen and slide back the top, which gives access to the control panel.
- Remove the control panel, which gives access to the main front panel.
- Remove the main front panel.
I inserted the transit rods before I started because I didn’t know if I was going to be rolling it around or anything. Having been through the process, I doubt it’s necessary to use them. But we’ll be starting from the same point if you do…
Because it’s a Miele, the transit rods probably aren’t in a cupboard somewhere or in a pile of stuff in the shed, they should be clamped to the back of the machine, in the purpose-built transit rod storage clamps. Insert them if you feel so inclined. But don’t forget to take them out before trying to run the machine again.

Take the detergent drawer right out. You have to push the little orange lever at the back, down, while sliding it out:

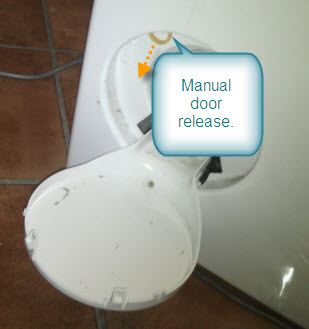
While you’ve got it in your hands, remove the little yellow wedge tool from the inside front of the drawer, and use it to open the pump panel at the bottom left front of the machine:
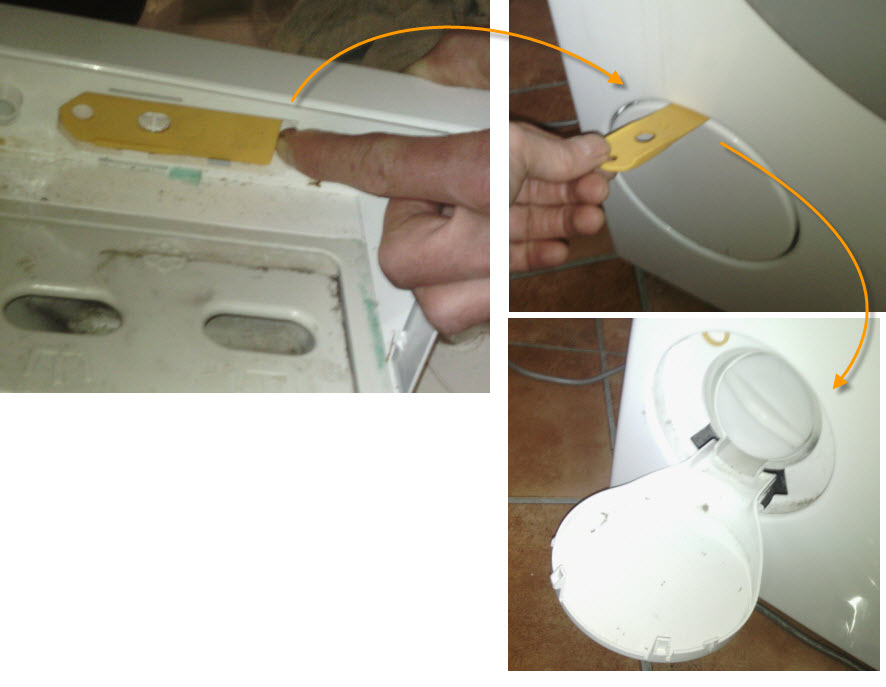
Place a tray under the panel cover (which is now acting as a spout) and unscrew the pump cover/lint filter (I don’t think it’s really supposed to be a lint filter – it does catch some big stuff, like my wife’s diamond engagement ring – but I’ll call it that for ease) a half turn or so to drain the residual water.
Near the top of the machine, toward the front, on either side, are ovalish-shaped shaped covers (one on each side). Prise these off (fingernail will probably do) to access the first torx screws, and undo both screws (one on each side). These are longer screws than the others – you may want to label them.
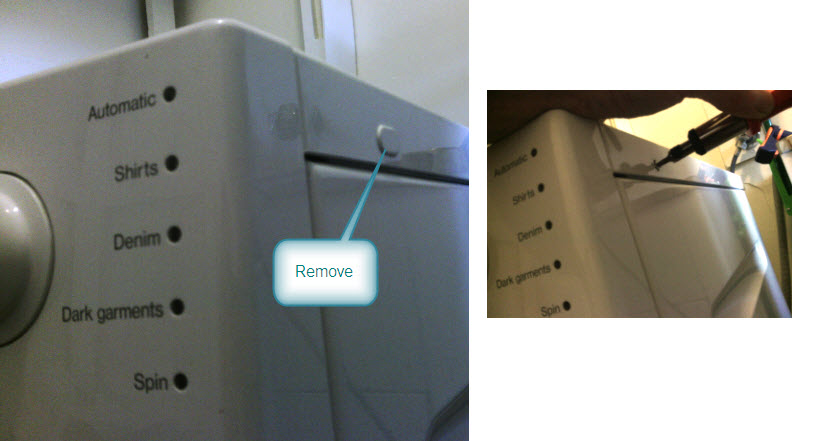
With both the screws out, you can lift the top cover an inch or so (there are some cool hinge-like lugs at the back of the lid that allow a little bit of movement) and then gently push it back a few inches. You can actually remove the lid altogether this way, but you don’t need to, so don’t.

The control panel is literally just sitting on top of the housing below it, guided into place by a couple of lugs on the bottom. So you can now just lift the panel vertically and it will come out (with all the wires and hose still connected). Turn it over and sit it on the chassis next to the lid, out of the way:
The panel removed (except for the connecting stuff), showing how the lugs hold it in place when assembled.
Open the door by pulling the manual door opener (the orange loop next to where you removed the lint filter) downwards:
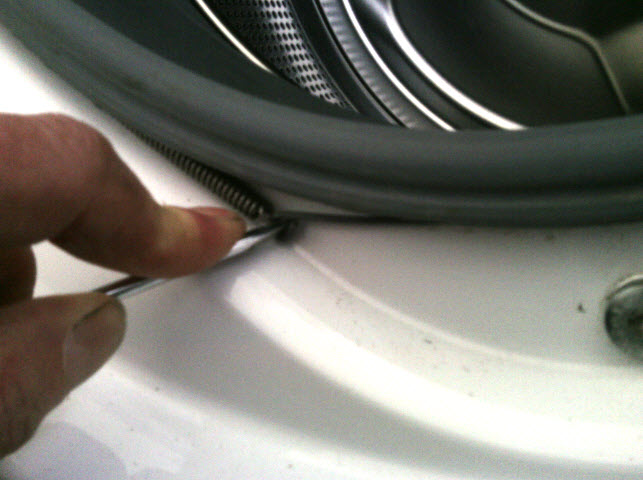
Remove the clamp from the door/drum seal. It’s a simple piece of wire with tension applied by a spring in-between the ends of the wire – stretch the spring (using a small screwdriver or similar in the eyelet on the end of the wire) and you’ll be able to gently ease the wire over the edge of the seal toward you to remove it altogether. Have a good look at where the clamp sits and how the seal is sitting over the lip on the front panel, as you’ll need to get it back into this state.
Ease the seal off the lip of the front panel and poke it back into the machine:

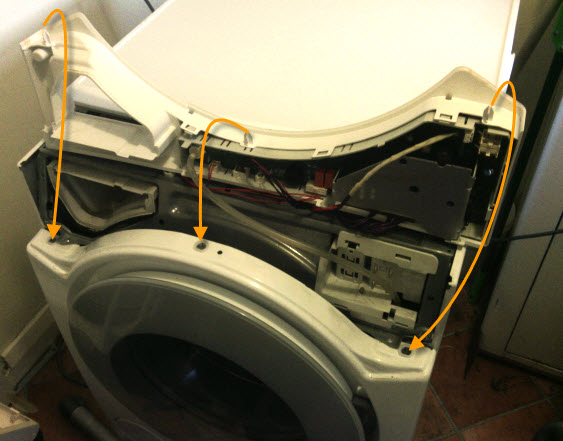
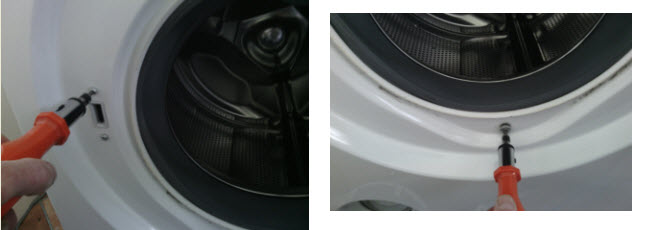
Remove the two torx screws on the female part of the door latch, and also the large (torx 30) screw at the bottom the door opening:
Remove the last two torx screws (one on each side) holding the front panel to the chassis, where the control panel normally sits (when you’re getting to the end of these, close the door a bit and support it so you’re taking the weight off, because there’s a fiddly bit coming up):

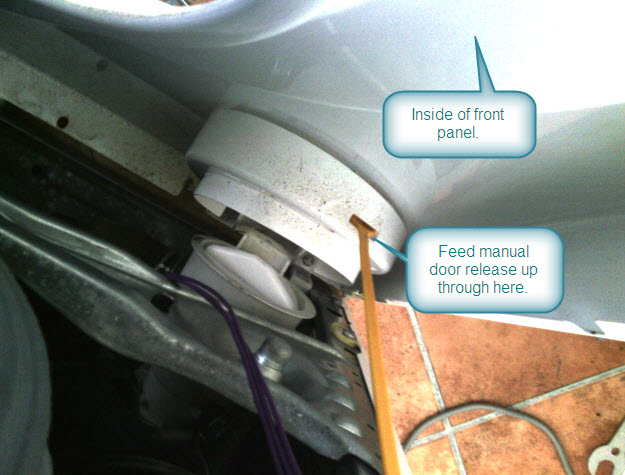
Ease the panel off, but not too far – you need to poke/feed the manual door release up through the hole from which it’s protruding so you don’t just snap it off (because that would suck).
You should now be able to remove the front panel entirely, leaving the innards exposed:

At this point, I carefully towelled out the water in the base (use an old towel or rags, there’s a little bit of grease and grime in there), tightened up the lint filter drain and poured a few litres of water into the drum and let it sit for a few minutes, then came back and watched. There were no obvious leaks, so I grabbed hold of the sump drain pipe (marked as ‘the culprit’ in the picture above) – simply because it was closest to me – and squeezed it a few times to expel any air lock, and sure enough it started leaking. Eureka.
I was quoted AUD$75 for a new hose. I figured a dab of silicone might do the job for less than that (I fixed an almost identical leak in my last washing machine the same way).
If your sump drain hose is what’s causing your problem, you can remove it as follows. If it’s not your sump drain hose, you’re on your own and you’ll have to look around for leaks elsewhere.
The end of the hose that connects to the pump is clamped by a piece of spring steel – requiring a pair of pliers to squeeze the ends together to expand the clamp – while the end connecting to the washer bowl has two wire clamps which are each held and tightened by their own phillips head screw. You’ll probably end up with a bit more water coming out when you drop the hose off.

The two screws can be completely unscrewed with no problem – there are no ‘pieces’ to the clamp that will fall apart if you do.
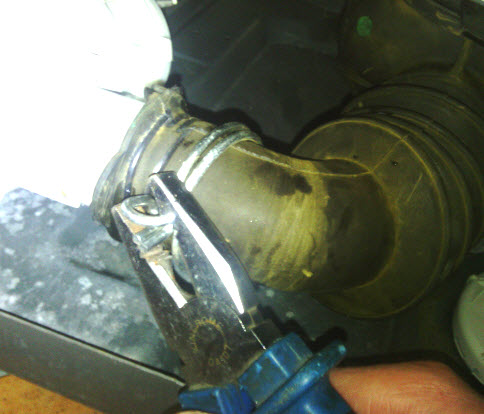
Even with the two screws completely undone, the clamps do not budge easily; I found they opened better if I used two hands to pull the ends apart, like this (except while on the hose…)

I then emptied the hose of all its booty, dried it out, cleaned around the hole with a little methylated spirits, and smeared a layer of silicone in and over the hole. I let it dry overnight, put it all back together, removed the transit rods, and it’s just done its first load of washing, with no alarms, so here’s hoping the silicone holds out for a few more years.