
A review of ‘Learn to Scythe’, by Steve Tomlin
Aug 03
***********************
I prepared this post for publication on www.scythes.com.au, but after reading it, my business partner Tony thought it was too wordy and critical, and he didn’t feel comfortable with it as being representative of Bladerunners’ views. I, on the other hand, didn’t feel comfortable promoting a book (which I feel is very worthy of promotion) without making a comment on the parts about which I had reservations. So we’ve reached a compromise – my full comments are published in isolation here, and we’ll add some very brief comments to our website along the following lines, should Mr Tomlin be happy for us to stock the book:
For Australian conditions and our products, we recommend:
- Fitting the attachment ring within 5-10mm of the end of the snath
- Mowing (when you’re comfortable doing so) from 4 or 5 o’clock on the right hand side (refer to page 28 for an explanation of the ‘clock’)
- Experimenting with using a wedge to adjust lift as well as lay (refer to the discussion here)
- Always honing a freshly peened blade prior to mowing
***********************
Steve Tomlin has done the scything community a great service, filling a void in the available literature – in English, at least – by producing a short printed guide for beginners which is both concise, yet packed full of the fundamentals with which every new mower should become familiar. As Tony put it, it’s the key points of a workshop distilled into a handbook.
Because Tony and I are really brilliant communicators, I ordered a copy of the book to assess with a view to stocking it and, unbeknownst to me, Tony ordered a copy because he was interested, and then left it at my house before my copy arrived, with a note stuck on the cover saying “I think we should ask if he wants us to stock it” – because he didn’t know I’d ordered one either.
While I agreed – that we should look into stocking it – I raised a few issues, which Tony thought was just me nitpicking. So, let it be known that the following comes from Marshall the nitpicker, not Tony the peace piper.
The issue I had was that I thought a few points (some minor, some more important) in the content could be (unintentionally) misleading for, or misconstrued by, our customers, so I’d at least want it on record what my reservations were, rather than just promoting a book about which I had a few concerns.
Let me stress again that I think the book is a fantastic contribution. My concern is simply that, being targeted at beginners, it’s likely to be treated as a mowing Bible, and therefore really needs to avoid ambiguities. An example of the risks that I raised with Tony was in reference to a mutual friend of ours who, having bought a scythe years ago, proceeded to follow the assembly instructions to the letter, and therefore glued his bottom grip on backwards, because the tenon joint in the instructions was depicted as being on the wrong side of the grip.
Now, there’s nothing so fundamentally flawed as that going on in Learn to Scythe, but I would argue that this strengthens my position: if an intelligent beginner can be convinced to make such a fundamental mistake because the literature is radically wrong, a beginner can certainly be unintentionally led astray by more minor problems in content, because the problems are more subtle. The position they arrive in will likely not be so problematic as a reversed grip, but it may involve one of those slight misconceptions that are difficult to shake off. I know I myself have laboured under several such misconceptions in my mowing experience, and will probably be able to identify a few more in 12 months’ time.
The book is a fine piece of work in terms of achieving its aims. I have a background in technical writing and admire the simplicity with which Mr Tomlin delivers relatively arcane subject matter; using a scythe well involves a lot of nuance, a fact that results in many writers – myself included – falling prey to unnecessary encumbrances in attempting to express those nuances. This is a risk he sidesteps beautifully while still delivering the goods, and the fact that the bulk of this ‘review’ will be focused on “issues” should not be taken as being indicative of wholesale disapproval; quite the contrary, the issues are more perplexing to me in the context of such a valuable book.
I’ll discuss the points in the order I encountered them.
Becoming attached
The ‘money shot’ on the book’s cover is very well composed – it’s intriguing and captures both the mystique of the art of working with the gear and the pleasure of working on the land. But what next jumped out at my nitpicking eye is that the attachment ring looks quite low on the snath. I wondered if it was just an unfortunate trick of the shadow, but in the section on ‘using the allen key safely’ (p.18) we see a closeup of the attachment ring being tightened, and it is indeed low, at least by my standards. Looking at other pictures in the book, including the photo of a broken down kit for the glossary (p.6), I’m left with the impression that this is by design; the clear plastic protector itself is fitted quite low, and the attachment ring is simply working within the boundaries of the protector.
I have a Swiss snath (of the same design as featured in this book) and a couple of attachment rings usually supplied with it, and the rings are around 25mm long (in terms of length on the same plane as we measure the length of the snath). To my eye it looks like the one pictured in the book is 25mm, and working to scale on that basis, I’d say that the photo showing the attachment ring being tightened up is somewhere between 18 and 20mm down from the end of the snath.
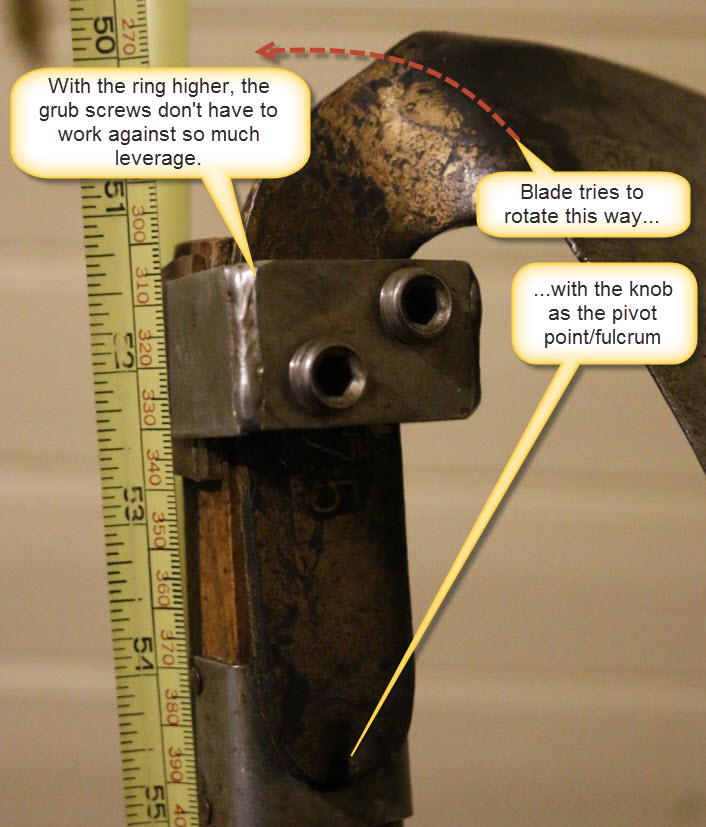
My Swiss snath and Austrian blade, with the ring set as we’d recommend it.
We recommend the ideal position for the attachment ring as 5-10mm below the end of the snath. So while we’re only talking about between 8 to 15mm differences, in terms of percentages that’s significant (and on one photo, on page 45, the ring looks to be more like 30mm down the snath). And the reason for recommending keeping the ring as high as practicable is that the further down the snath the ring is attached, the more prone to slipping the blade is, due to the extra torque/leverage the ring’s grub screws have to contend with; so, with a blade that is many more times longer than the tang, those millimetres make a real difference to how well the attachment ring can hold the hafting angle in the position you set it.
So I’m left wondering why the rubber protectors and the rings are so low on the pictured snath. The rubber protector certainly isn’t so low on my own Swiss snath. Some possibilities, for the sake of interest, include:
- The supplied rings are deemed too narrow to get a wide enough range of adjustment in hafting angle, so the ring needs to be located lower to compensate (the lower the ring, the wider the range of movement the tang has within it). This seems unlikely, especially for such a well-established rig as the Swiss snath and Austrian blades; surely the rings would just be ordered wider.
- Whoever fitted the rubber protector had trouble with the fasteners splitting the ends of the snaths when they were placed too close to the end (we encountered this problem early on, which is why we don’t fit the rubber on the very end of the snaths – but we’re only about 5mm down and they work).
- Mr Tomlin actually prefers the rings to be set as pictured, in which case some explanation for that preference could have been instructive.
I also have to allow for the possibility that grasses in the UK typically offer less resistance than what we encounter here in Australia, such that the position of the ring isn’t so much of an issue in England’s green and pleasant land.
Regardless of the reason for the position pictured, our recommendation to our customers in Australia is to raise the ring to be 5-10mm from the end of the snath. Our Canadian snaths are a little wider than the Swiss, as are our purpose-made rings, so there is a bit more adjustment in hafting angle available to our customers on that basis, so there would be less need to lower the ring to gain a more extreme hafting angle (if indeed that’s the reason for it).
Wedgie!
I personally found the inclusion of wedges in the photos on pages 19 and 20 (the latter demonstrating lift) – before they’re mentioned in the text of page 21 as a remedy for poor lay – potentially confusing. It made me think a beginner may be led to believe that a wedge should be part of a standard setup, before they encountered the text that describes their application.
Conversely, while the photo of a poor lay includes a wedge, the potential use of wedges for adjusting a poor lay of the blade is omitted from the text altogether; rather, to avoid a poor lay, the user is advised to hold the grips to better position the blade. At face value this guidance would appear to fly in the face of good ergonmics, but it’s likely that this advice is simply a function of the fact that the Swiss snath and Austrian blades – the products Mr Tomlin promotes – are (after years of agitation from the likes of Peter Vido) now designed with each other in mind, so that the likelihood of a really poor lay is low for Mr Tomlin’s intended UK readers.

Using a wedge to lift the toe: looking up the snath from the blade end.
This is certainly one advantage the retailers of the Swiss/Austrian combination have over us in promoting our Canadian/Italian/Turkish combinations: we have to modify our blades ourselves, where required, to match them to our snaths. And because everyone holds a snath differently, we highly recommend that our customers do experiment with wedges to adjust lay, rather than trying to compensate for a poor lay by modifying an otherwise preferred hand/wrist position; check out the diagram here.
What time is it?
This was the issue that concerned me most; the reference to mowing from 3 o’clock to 11 o’clock (p.28) – that is, with your body as the pivot point and the scythe as the hour hand of a clock, the author suggests imagining 12 o’clock as dead ahead, and that you should start the swing with the scythe in the 3 o’clock position and finish at 11 o’clock. I was relieved to read a few pages later (p.32) that once you get used to that, you can finish your swing further back on the left, to complete a 180 degree arc, finishing at 9 o’clock rather than 11 o’clock. I expected to read that you can also start the swing much further back on the right than 3 o’clock as well, but that information never came.
I found this really confusing, firstly because I would hate to have to mow starting from 3 o’clock. It’s certainly possible, but if you’re mowing in rough cocksfoot clumps, for example, it gives an advantage to start your swing further back behind you (where the grass is already cleared) so that you get the blade moving before it has to do any cutting work. In simple terms, it gives you a bit more momentum, and while mowing should never be about brute force, investing that little extra energy before the blade actually has work to do can pay nice dividends.
The second reason I found it confusing was because I couldn’t remember ever having heard anyone else suggest 3 o’clock as the correct starting position for the swing, nor could I picture any of the mowers I admire mowing in that fashion. Then I remembered that Mr Tomlin himself is a mower I admire, and went looking for a video of his mowing, and found that he also seems to start closer to 5:30 than 3. Note the backswing of the scythe from one of Mr Tomlin’s mowing videos:

For those who haven’t seen it, it’s worth watching for instructional value: https://youtu.be/K_LVVui8o7g
I wonder, then, if there’s some strategy going on here; perhaps the author felt that encouraging backswing was likely to lead to hacking. Indeed, he has infinitely more experience in instructing new mowers than I do, so he would be far more knowledgeable in regard to the pitfalls beginners are likely to fall into, so he may have made a considered decision to let mowers discover backswing as a natural progression. But given the advice at the start of this chapter (p.25): “I recommend watching a video of someone mowing in this style…” – the confusing contradiction between such videos (including his own) and his text would soon become apparent. Indeed, I’m not sure I’ve ever watched any video of someone mowing comfortably and efficiently by starting their swing at 3 o’clock.
So, again, my recommendation to our customers would be to keep in mind that your backswing can extend well behind you. The same principles apply – keep the blade low/on the ground, and when it engages with uncut grass it should be slicing, not hacking. I would suggest trying to start off at 3 o’clock though, as Mr Tomlin suggests, and see how it goes; not because I think it’ll work better, but because I expect that he has a good reason for suggesting this, stemming from his relative wealth of experience as an instructor – to which I’ll happily defer.
Topping it off
The last point I had an issue with was this statement in the section on freehand peening:
It is possible to freehand peen the very edge of the blade so it is sharp and doesn’t reflect any light but if you can’t achieve this, follow the sharpening procedure explained above… (p.61)
The “sharpening procedure explained above” referred to there, is honing the edge with a whetstone.
This struck me as a curious statement for a number of reasons. The first is that while it may be possible to peen an edge to get it sharp enough to mow with, I doubt doing so could possibly be easier than peening and then honing, nor that only peening could possibly produce a sharper edge than that same peened edge suitably honed. Indeed, it seems to be somewhere between implicit and explicit in the author’s suggestion that honing is an easier way to get a sharp edge: if you can’t achieve it by peening,you should hone it… because it’s easier to hone.
Putting it another way, I don’t understand the rationale for portraying honing as a poor second best to hammering only, in a book designed for beginners. Doing so risks making some people want to strive (and in doing so, fail) to get a ready-to-mow edge with a hammer only, instead of encouraging them to learn good honing, which will most likely give better results than hammering-only anyway. I can see one argument for peening-only sharpening (which I’ll get to shortly), but if that position is genuinely held as being the ideal to aim for, I think actually making the argument would have been more useful to readers than simply suggesting honing is somehow inferior and leaving it at that.
My journey with edge tools is still fairly short – while I’ve owned good knives for years it’s only really been since taking up mowing that I’ve started paying real attention to sharpening. I’m also embarking on learning about the use and maintenance of cut-throat razors, so that’s taking the crazy-sharp thing to another level. So once again I have to acknowledge that Mr Tomlin – as a greenwood worker – is much more experienced than I am in using and (I assume) maintaining edges. So I’m very open to being corrected on these points and learning something in the process.
As I understand it, the key components of a good edge are (apart from good material) an appropriately angled bevel for the task at hand, and then getting that bevel as smooth as possible to increase the ease of penetration.
And thinking about what’s going on at a level of magnification when peening, it seems unlikely to ever produce the best possible result: when you hammer an edge of steel, it behaves a bit like a fluid – it gets low spots where the crystalline lattice is deformed down and relative high spots where the steel is pushed out and bulges a bit. And when peening, you are dealing with three curved surfaces (hammer face, anvil face, and blade), each curving in at least two planes (three in the case of the blade), so unless your point of impact is exactly the same with each blow, and unless your blade (which you are moving with one hand) is positioned exactly the same way for each blow (and by ‘exactly the same’ in this context, I’m talking about maintaining the same line of impact such that it’s indistinguishable even under a low level of magnification), your edge is going to have slight peaks and hollows and bulges. Keeping in mind that due to the manufacturing process, the blade itself is going to be non-uniform at a magnified level even before you start hitting it, there are obviously a number of factors working against your achieving an even bevel on your edge, which is key to a sharp blade.
Now, the same is of course true with honing – you never get a perfectly smooth edge, and the edges of whetstones are never completely regular under magnification either – but the action of honing is designed to minimise the irregularities and you are always moving closer and closer toward that unreachable limit (electron microscope photography of different edges in different states of sharpness is very instructive here… I have a book with pictures taken at x250 magnification and a knife honed to 1000 grit looks like it’s been attacked with a concrete grinder, while a sharp razor edge is almost smooth under the same magnification). That’s why knives and razors (and, often, scythes) are honed with progressively finer grits – first you set a bevel (i.e. as regular an angle to the edge possible for the whetstone in question), and then you work to smooth off that bevel to make it penetrate even more easily.
This brings me to the one argument for hammer-only sharpening I can think of: with a hammer you are likely to achieve a more highly polished and smooth finish (because the hammer does its work by impact rather than by abrasion – and indeed we who peen rely on that polish produced by the hammer to show us “where we’ve been” along the edge) – at the point that takes the impact. But I’d argue that the chances (and it would be more like a lottery) of your achieving that uniform edge geometry on your bevel, and no bulges and thicker spots on the very edge at the magnified level – are very, very slim. Because it’s a hammer; it was never designed to be able to give the kinds of results that you can really only adequately assess visually with a microscope – hammers don’t achieve microscopically consistent results, which is why we hone razors with stones in grits of the tens of thousands, rather than hitting them with a hammer.
Now, again, I have to stress that I’m not saying it’s outright impossible to get an edge ready to mow with a hammer only. But I cannot understand how – once you’ve achieved that – taking a suitably fine whetstone to that edge is going to do anything other than improve an already good level of sharpness. If you can mow grass with an edge you’ve hammered, once you hone that edge you’ll take off the high spots and so even out the edge even more, and it’ll cut even better.
So the suggestion that an edge should be honed only if you can’t get a sharp edge with a hammer, is one I don’t understand.
Conclusion
The book’s fantastic, and a real boon for the community, and if you haven’t done a bit of reading on the basics of scythe use and you’re still finding mowing difficult, you should buy it. We’re hoping to stock it ourselves and hopefully save you a bit on postage, but in the meantime, or if that just doesn’t happen, you can buy it direct from Mr Tomlin.